Hey everyone, welcome to my recipe page, looking for the perfect Paint drip neon tie dye birthday cake😆 recipe? look no further! We provide you only the perfect Paint drip neon tie dye birthday cake😆 recipe here. We also have wide variety of recipes to try.
Before you jump to Paint drip neon tie dye birthday cake😆 recipe, you may want to read this short interesting healthy tips about Ways To Live Green And Save Money In The Kitchen.
Remember when the only people who cared about the ecosystem were tree huggers and hippies? Those days are over, and it seems we all comprehend our role in stopping and possibly reversing the damage being done to our planet. The experts are agreed that we cannot adjust things for the better without everyone’s active involvement. Each and every family ought to start creating changes that are environmentally friendly and they should do this soon. The kitchen area is a good place to start saving energy by going more green.
Refrigerators and freezers use a lot of electricity, particularly if they are not running as effectively as they should. You can easily save up to 60% on energy once you get a new one, when compared with those from longer than ten years ago. Keeping the temperature of the fridge at 37F, coupled with 0F for the freezer, will certainly save on electricity, while keeping food at the correct temperature. Checking that the condenser is actually clean, which means that the motor needs to operate less frequently, will also save electricity.
From the above it really should be clear that just in the kitchen, by itself, there are many little opportunities for saving energy and money. Green living is something we can all accomplish, without difficulty. Typically, all it will take is a bit of common sense.
We hope you got insight from reading it, now let’s go back to paint drip neon tie dye birthday cake😆 recipe. To make paint drip neon tie dye birthday cake😆 you only need 13 ingredients and 8 steps. Here is how you achieve that.
The ingredients needed to prepare Paint drip neon tie dye birthday cake😆:
- Use 2 boxes of tye dye cake mix
- Use 1 homemade buttercream frosting or can of wilton buttercream frosting
- You need 1 Box of premade black fondant
- Take 1 Box of neon gel food coloring
- Take 1 bag pink candy melts
- Take 1 bag yellow candy melts
- Use 1 bag blue candy melts
- Prepare 1 can white frosting
- Provide 3 little bags of sixlet colored chocolate candy balls-Blue, Purple & Green
- Provide 3 empty clear condiment squirt bottles
- You need 6 disposal cups
- Provide 2 10inch cake pan
- Take 2 8 inch cake pan
Steps to make Paint drip neon tie dye birthday cake😆:
- Pre heat oven to 350. Mix both cake boxes as directed. Then grab your 12 disposable cups. Measure 1 1/2 cups of batter in each of the 6 cups. Now grab your neon food coloring gel & add them to each cup to make individual different colors you want your layers to be.
- Once you have you 6 cups of of cake batter colored to your liking. Then grease your pans & begin adding your cake mix to the pans. Pour a 1/4 cup of the 1st color you choose directly in the middle of your 10inch cake pan. Add another 1/4 cup of another color directly in the middle on top of the other cake that was poured.
- The cake will spread in the cake pan by it self. Do not shake of manipulate it. Keep pouring 1/4 of each color just one time for each color. Grab your 8 inch pan & do the same thing. It should look like this!
- Place both pans in oven side by side. Cook for about 25 mins or untill you stick a toothpick in the middle of the cake & it comes out dry not wet on the toothpick. Take out & let cool completely for about 15 mins. Then pour the rest of the batter in your other 10 inch & 8 inch pans like you did before. One layer at a time. Place that 2nd batch in the oven like you did the 1st batch. Let cool completely. While cake is cooking. Spit the fondant in half. Knead the fondant & roll out enough to cover the two layers for your cake.
- While cakes are cooling either you can make your buttercream frosting or use a container of wiltons already made buttercream frosting. Once your 4 cakes are cooled completely. Place a medium size circle of the buttercream frosting on top of the 10 inch cake. Then place the 2nd 10inch cake on top of the other one. Place a nice layer of buttercream frosting on top of the both cakes. Smooth out. Next grab the two 8 inch cakes and repeat the same thing to it.
- Take your rolled out black fondant and place 1 of them on top of the stack of the 10 inch cakes. Smooth out the best you can.Then do the same with the other rolled black fondant to the 8 inch cakes. Now your two layered cake is almost done. Squirt a nice glob of white can frosting on top of the 10 inch cake. Then place your 8 inch fondant covered cake on top of the 10 inch fondant covered cake.
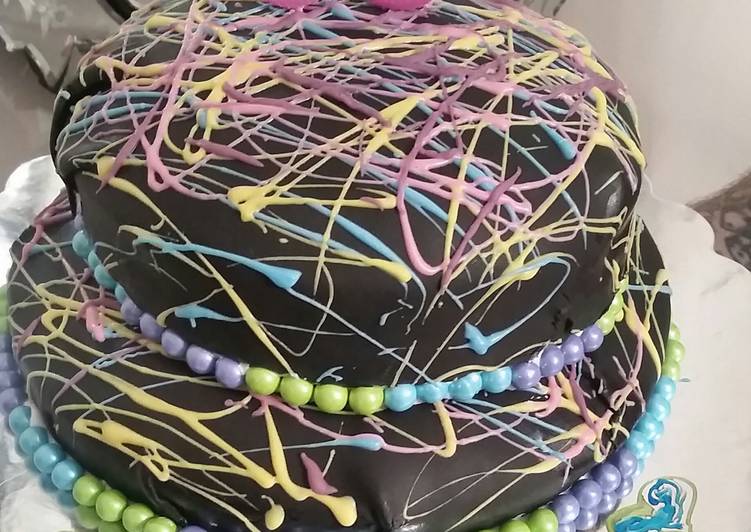
- Grab your candy melts place them in your condiment containers. Add 1/4 teaspoon of vegetable oil in each container to help thin the melts out. Place each in the microwave for 30 second intervals. Once the melts are melted down. Drizzle them on the two layered of the cake in a zigzag zag & swirl pattern. One color at a time.
- Take the white frosting can and squirt along the seams of the two layers of the cake. Add the sixlet candy balls to that frosting seams all the way around the two layers. EAT AND ENJOY!!!
If you find this Paint drip neon tie dye birthday cake😆 recipe useful please share it to your good friends or family, thank you and good luck.